Showing posts with label Embossing Folders. Show all posts

Wednesday, July 11, 2012

Sparkle N Sprinkle Christmas in July Blog Hop

It's Christmas in July!!!  
Time to start thinking about all those fab Christmas projects you're going to do this year. I always put it off way to long and never get everything done that I plan on doing. This year will probably be no exception. LOL We're hoping that this hop will help everyone get their Christmas mojo started! 

If you hopped here by way of the super fabulous, Gerlinde Townsley - then you're in the right place!
Otherwise, you may want to start at the beginning so you don't miss a thing.  Since there are five awesome prizes - you don't want that to happen :)   Three of the prizes are "hidden" on 3 of the designers blogs - SO - if you miss one - you miss a chance at a prize.

You MUST leave a comment on each and every blog to be eligible for prizes. 
 BUT - you don't have to leave them all at once - it's a two day hop - just make sure you get a comment on each blog by the end of the second day....

By now you've probably already gotten the word that we have a brand new designer at Sparkle N Sprinkle.  Michelle Perkett brings us some really beautiful designs and they'll be available in digital image form along with a selection done in "conventional" rubber stamps.
Woofie's Christmas - Set 468S is a stampette set with one of those designs.  He's an adorable little puppy playing in the snow and I thought that would be a fun way to start.


I stamped him with Memento Tuxedo Black ink and colored him with my Copics.  A little Sparkle N Soft Twinkling Clouds flocking and some Sparkling Snow glitter added my "bling".
The white background panel was done using the Stampin' Up Northern Flurry embossing folder.
Spellbinder Oval and Scalloped Oval Dies and two sizes of oval punches rounded (or ovaled) out the rest.  The beautiful green velvet skinny ribbon was from May Arts.
 Here's a close-up of the "bling"


For my second project, I decided on total bling!   I started with a Super Adhesive Sheet.  Removed the top protective layer (save this) and placed it sticky side down onto cardstock for stability.  I then used the Spellbinder Heirloom 2010 Dies and die cut my ornament.  Using the "saved" protective layer from the first step - punch and/or die cut out embellishments and use those for masks.  NOTE:  You can also die cut other intricate shapes - instead of the ornaments and use the second protective layer after removing it for a mask too.  
Peel the protective backing off the ornament - lay on the masks that you'd like to use (make sure to put the slick side down so you can remove it again).  Glitter with your main color - being sure to rub in the glitter well and brush off the excess.  With tweezers, remove the first mask - rub in your next glitter color and brush off the excess.  Continue this until you have removed all the masks.  Add some rhinestones and ribbon and VOILA!!!
Easy Peasy!!!
These can be used for gift bag decorations, gift tags, ornaments - or on your cards or scrapbook pages.  The sky's the limit!


Here are close views of the individual ornaments.  I used the two larger sizes of dies and a selection of the fabulous Sparkle N Sprinkle Glitters.


Hope these will inspire you!

If you've hopped with us before, then you know that I'm the end of the line always....   If you've missed any - just go back to the Sparkle N Sprinkle Blog.    If you've seen something that grabs your fancy, here's the link to the shopping section of the website. 
Check out the digital image section to see Michelle Perkett's line and the New Product section to quickly see the Michelle Perkett stamp sets along with several other new stamp sets that debut today.

All the Christmas & Winter, Jewish & Christian stamps are 15% off this month along with a selection of Glitter, Glitter Tinsel, Embossing Powders & Flocking.

Thanks so much for joining the hop!


x_3ca76894">

Wednesday, March 21, 2012

BLOG HOP - March 22-23 - FLOWER CHILD

Welcome to the Sparkle N Sprinkle Flower Child Blog Hop!

If you hopped here by way of Marie Berquist's super fabulous Blog, then you are in the right place!  Otherwise, you might like to start from the beginning at www.sparklensprinkle.com/blog to become eligible for 5 fabulous prizes.   To be eligible for the prizes, all you have to do is leave a comment on each designer's blog.  You MUST leave a comment on each blog to be eligible though.   Three of the prizes are given by individual designers and no one knows who they are so it's important to comment on them all!
Here's a complete list just in case you got lost along the way.

www.sparklensprinkle.com/blog
Shanna Shands   http://scsdesigns.blogspot.com
Barbara Bruder  http://www.artandsoulcreations.blogspot.com
Angie Blasingame   http://hopemorestudio.blogspot.com
Karalee Ingram  http://kareescardsandcraftsofcourse.blogspot.com
Shona Erlenborn   http://shonasstampingstage.blogspot.com
Julie Zippel  http://backtobasicsandbeyond.blogspot.com
Charlene Driggs   http://www.paperandinkplayground.com
Lana Clarke  http://sweetpeaspapercreations.blogspot.com
Karin Martin   http://karin-withaniforpaper.blogspot.com
April Williams   http://stampwillydesigns.blogspot.com
Gerlinde Townsley   http://mycreativecorner-gerlinde.blogspot.com
Marie Berquist  http://craftemarie.blogspot.com
Jill Jacobsen   http://www.stampinhands.com
Brenda Smalle  ***** You are here :)

We all have different ideas on the Flower Child theme, but since I came of  "age" in the late 60s/early 70s -  Flower Child has that 70s feeling for me.  I moved to NYC in '69 and spent a lot of time in Greenwich Village and a few weekends in San Francisco too.  Some friends went to Woodstock, but I was too new to NYC to brave that LOL.   I hope you enjoy this first card and reminisce about the Peace - Love - Rock N Roll era and my generation. 


Most of the images from this card are from Sparkle N Sprinkle Stamp Set 455 Surf's Up.   The little girl is Tomboy Becca from Set 412 - Daddy's Little Girl and I added the FLOWER POWER  "ricky ticky flowers" - you remember those from the 70s LOL - to the VW Van (or micro mini bus to the older generation) using the Daisy Background from Set 411 - Just Like Mommy.    The peace symbol band was created by stamping the image randomly - coloring with Copics - patting Versamark ink all over it and then embossing it with Sparkle embossing powder.  Becca's shirt & head and then again the flower were layered as 3-D.  Lots of dimensionals, glitter & glossy accents were used.

Here are some close-ups:


Hope I was able to bring back some fun memories for you! 
 I certainly brought back some for myself!!!


For my second card, I decided to stick with children and flowers together, but went in a different direction for this Z-fold baby card.


For this one, I used Bailey in Diapers from Stamp Set 380 - Baby Bailey and Welcome Little One from Set 381 - Baby Brooke along with the Lolly Dot Flowers from Set 397 - Lolly Garden.
The Lolly Dot Flowers were embossed using Sparkle N Sprinkle's Kiwi Fruit EP401, Melon Twist EP402 and Jamaican Dream EP403 and cut out using a scalloped round punch. 
Bailey was colored with Copics and cut out using Spellbinder's Lacey Circles Dies and then mounted on a teal cardstock piece cut out with the Spellbinder's Blossom Die.  To keep it closed, I made a tab with a Label punch and added a magnet under the tab and under the opposing flower.

Here are some other views:


I hope you've enjoyed my little foray into the Flower Child generation!

I'm the end of the line........  don't forget to comment on each designer's blog - they cherish each and every comment that you make....  who knows!  You could win a prize - it's that simple.

If you've seen anything that you can't live without or you just want to check out what other neat things they have,  then check back to the Sparkle N Sprinkle on-line store.  You'll find all sorts of fun items there and lots more inspiration in the gallery too.


PEACE

x_3c1d5da7

Thursday, January 26, 2012

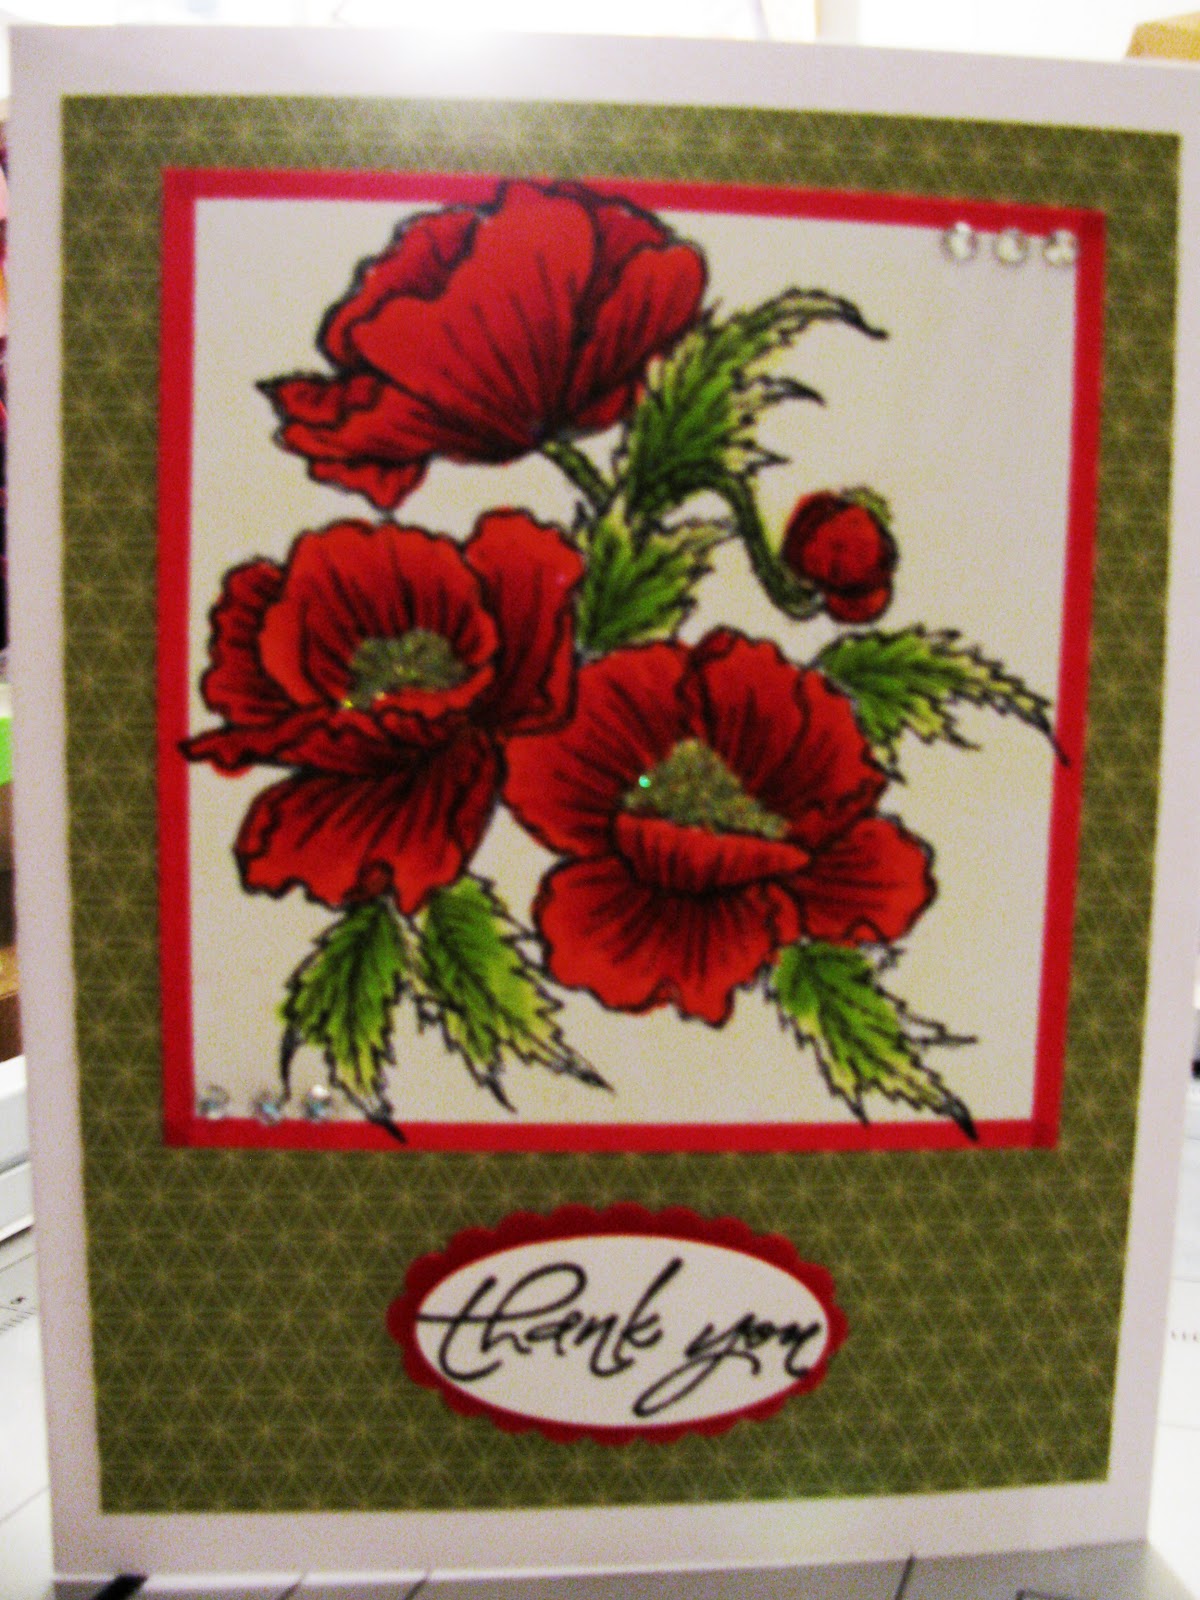
Floral Thank You

Thought I'd get in one more post before leaving for CHA on Saturday morning.   I've done two cards using one of my favorite floral images from Yvonne Albritton who, unfortunately, is no longer in business.  She had such beautiful images.  Both are Thank You cards - one using a phrase from Sparkle N Sprinkle and one from Stampin' Up.
The cards are both colored with my trusty Copic Markers.  They're highlighted using Sparkle N Sprinkle Sparkling Snow glitter and rhinestones.  The top has an embossed front and the bottom has DP for the front.    It's such a bold image and is great fun to color.


Wednesday, January 18, 2012

Deco Divas - Love is in the Air Blog Hop


Welcome to the Sparkle N Sprinkle - Deco Divas - Love is in the Air Blog Hop!!!
If you hopped here by way of  Jill Jacobsen's blog, then you are in the right place!
Otherwise, you might want to start back at the beginning  (Sparkle N Sprinkle) to make sure you are eligible for the four great prizes that are available. 

I really like the Heure de Party image by Gail Burton, so I chose that to share with you for this hop.  I pretty much stuck to the Deco Diva portion of the blog hop and have done the same image in two different styles and colors.

The first is black & white with a hint of red.  I used my trusty Copic markers to color the images on both cards.  Sparkling Snow glitter from SNS is used to highlight this one and Silver Leaf glitter tinsel also from SNS edges the rosette.  Some black velvet ribbon - a gorgeous black and white swirl designer paper, a crystal ring, a half pearl and rhinestones top it off.

Click on either of the main images to go directly to the SNS Gallery for full instructions and products.


For my second card, I decided to go with jewel tones.  I used Bridal & Orchid glitters from SNS to highlight the dresses and Purple Dust on a strip of Super Adhesive Sheet for the border.  I topped it off with a border punch from Martha Stewart and some half pearls and crystal flowers.  The black background was stamped with Versamark and I brushed on Interference Violet Perfect Pearls from Ranger over the Versamark to achieve just a hint of design.  The Spellbinders Label die cut out was then embossed using one of my favorite embossing folders from Stampin' Up.


 I hope you enjoyed the blog hop and all the fabulous cards that the designers have created!  No one knows who has the mystery prizes on their blogs so don't forget to leave a comment on every blog to be eligible for the prizes and be sure to head on back to the Sparkle N Sprinkle Blog to answer that mystery question!

Thanks for spending a little time on my blog!  Hope you enjoyed it!


Your final destination is the SNS Blog! To become eligible for the Grand Prize and three mystery prizes, please leave a comment on my blog below and return to the SNS blog and answer one or both of the following questions. There are no right or wrong answers LOL


What's your favorite Valentine's Day tradition???   What's your inner Diva like??   Answering these questions back on the SNS Home Blog comments makes you eligible for the Grand Prize and 3 other secondary prizes! Good Luck!

Scroll down just a bit more for the comments section.................


x_3bfa4fe2

Sunday, November 27, 2011


Since Christmas is fast approaching, I thought I'd start off my merry little blog with 3 of my favorite "Hat Lady" Christmas cards using the fabulous images from Sparkle N Sprinkle.


The first card showcases Sparkle N Sprinkle's  Lara - colored with Copic Markers and highlighted using
The Spellbinder's 2010 Heirloom Ornament Die - topped off with a bow and a bit of bling!


Next up is Maryanne who can be found on Sparkle N Sprinkle's Stamp Set 164
 - again using Copic Markers to color the image
 - Spellbinder dies using the Out of the Box Nesties technique and a bit of
bling added using Sparkle N Sprinkle's Silver Leaf Glitter Tinsel


Lastly is Sparkle N Sprinkle's Isabelle -  colored with Copic Markers -
layered using Spellbinder Dies - metallic bling - rhinestones
and the fabulous fur stole is created with soft fuzzy Swanky Gray flocking from
the Sparkle N Sprinkle collection.


I hope you enjoyed these as much as I enjoyed creating them. 
Brenda
Related Posts Plugin for WordPress, Blogger...
Blogging tips